Unknown's avatar

About Robin

Owner of Meridian Jacobs, farm and fiber shop. I raise Jacob sheep, teach fiber arts classes, weave handwovens for sale, and manage the store.

Weaving Retrospective 2024

I number all my warps (except for the ones I forget to put in my notebook like some of the rigid heddle projects). Someday I’ll have to look for the notebook with #1, although that wouldn’t be truly #1–it would be the first one I recorded. I think that notebook is here somewhere.

The first one this year was #1351. The notebook page says 12-26-2023, but that would be when I started winding warp. I wove most of the ten blankets in 2024. This photo is two Year to Remember blankets. The one on the left was a custom blanket, commemorating the recipient’s wedding anniversary.

This Year to Remember blanket (Vacaville, 2023) is woven with yarn I dyed using plant material growing here. It is still available on the website.

One of my favorite patterns, also woven on this warp using gray Jacob yarn for weft.

I wove several v-shawls in 2024. The one on the left is still for sale here.

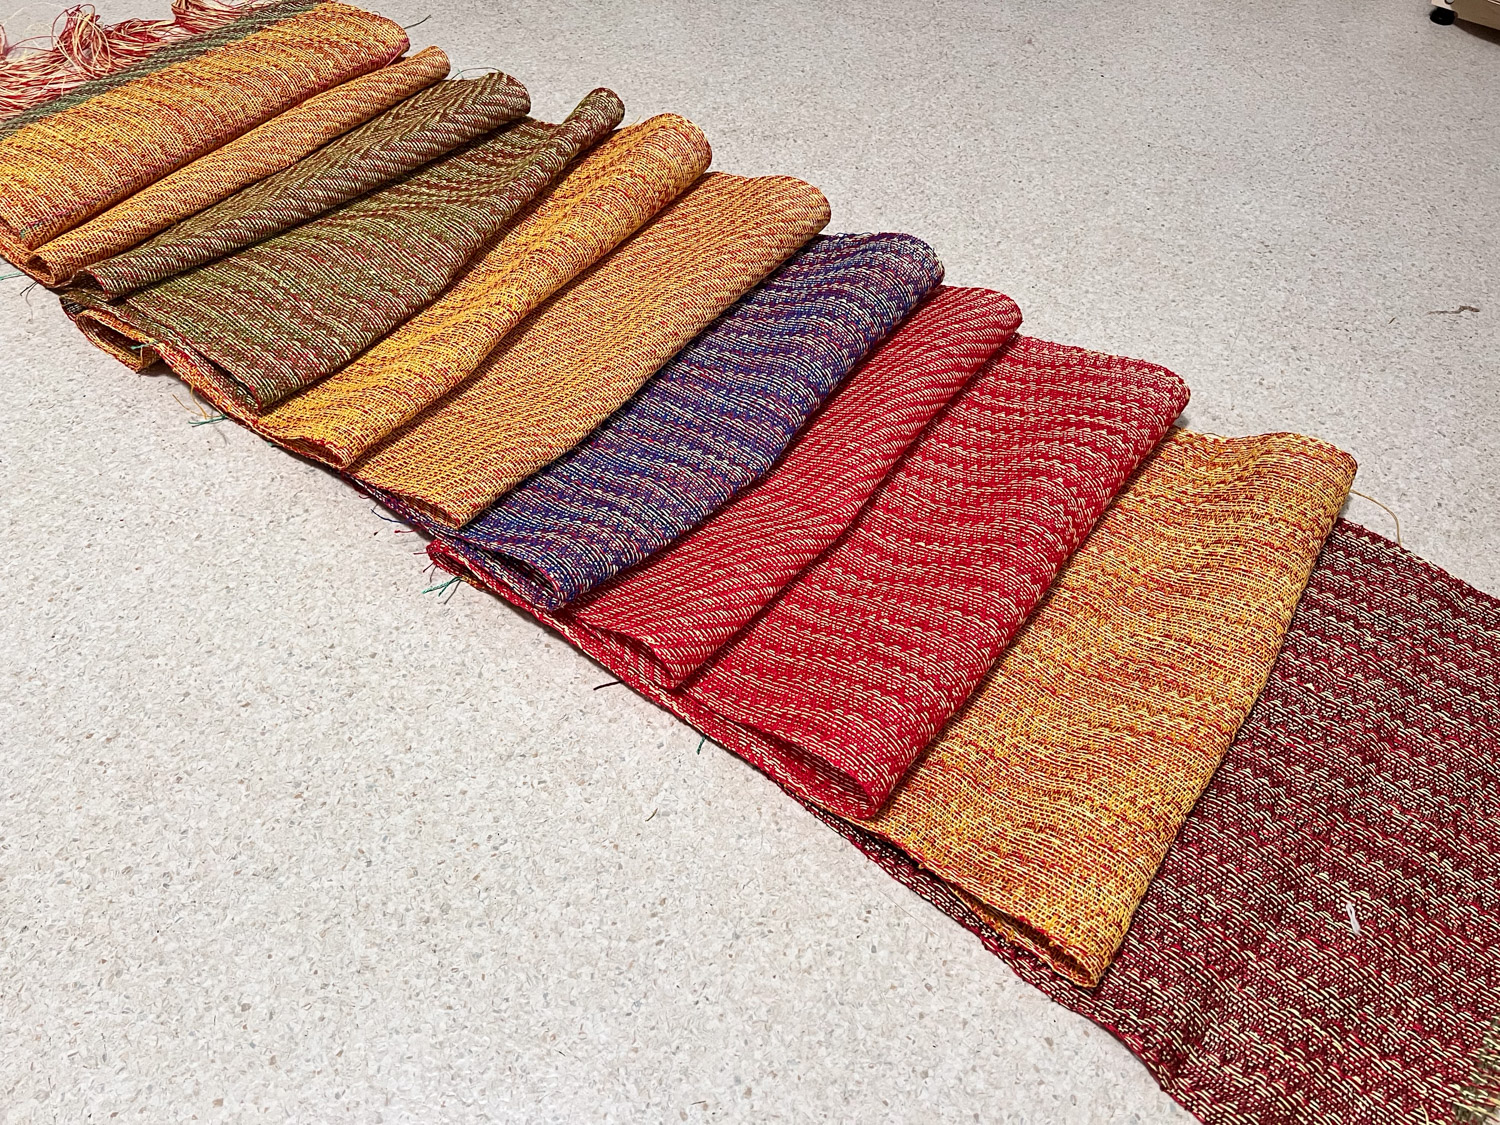
Warp #1387 went on the loom in July, but I didn’t finish the last blanket until December. I get distracted by weaving on other looms and the rest of life going on around me. This photo shows how each weft yarn may behave differently. Some yarns have more elasticity than others, either due to the type of wool or whether or not they have been naturally dyed. The warp and all the naturally dyed yarns are Timm Ranch wool from various years.

Here is that warp off the loom. The blue weft yarn was naturally dyed with my home-grown indigo. The brown yarns are mostly dyed with walnut hulls. Yarns on the left are Ashford DK.

Finished indigo and walnut hull blankets.

The last warp of the year was #1404, a warp for three chenille shawls. This is the first piece off the loom in the process of twisting fringe. This warp is still on the loom with two more shawls to weave. I had wanted to get at least one off to get it to the Artery before the last couple of shopping days before Christmas.

Warp # 1403 went on the loom before the chenille warp, and I finished it just in time for our family Christmas on the 27th. There are ten hemp towels.

There are two colors in the warp and a different weft color in most of the towels.

Another favorite this year was a chenille warp. I wove two rectangular shawls and this piece that is sewn to leave a neck hole and be worn over the shoulders sort of like a poncho. I will put this on the website soon.

New Year’s Day 2025

I planned to go on a hike today, but that was mid-day. Feeding sheep is first.

Sunrise viewed from the barn. After chores I drove to the newly opened 1500 acre Patwino Worrtla Kodak Dihii open space park managed by Solano Land Trust, outside Fairfield and only about 25 minutes from home. I had never been to this park but had read about the progress made on opening it for the public.

The park is usually open Friday through Monday, but there was a special New Year’s Day docent-led hike. There is good signage throughout the property so you can always figure out what trail you are on. We started at the Welcome Plaza at the bottom of this map. We saw the east half of the property, making it to the loop at the northeast and then back down the Bay Area Ridge Trail. That was just under six miles total.

This is oak woodland. The blue oaks are deciduous so they are bare now. The recent rains have brought the landscape to life with green grass.

That is Mt. Diablo in the distance. That’s the mountain that features in many of my Across the Road photos because those are taken from the property just across Meridian Road where we live. Wikipedia says, “The Mount Diablo Meridian, established in 1851, is a principal meridian extending north and south from its initial point atop Mount Diablo in California at W 121° 54.845. Established under the U.S. Public Land Survey System, it is used to describe lands in most of northern California and all of Nevada.” DavisWiki says “Meridian Road is a north-south road, roughly located between Dixon and Vacaville. The Meridian refers to its location on the principal meridian for NorCal for the US Public Land Survey. If you were to travel due south from the road, you’d hit the peak of Mt. Diablo, a prominent geological landmark.”

The wind turbines along Hwy. 12 on the way to Rio Vista feature in the view to the southeast.

There are live oaks interspersed with the deciduous blue oaks.

These blue oaks are magnificent with and without leaves.

Another view that includes Mt. Diablo. Hopefully I’ll go hiking there one of these days. I was there in 2020 and this is the blog post (on my website) about that.

I will definitely be back here in the spring for wildflowers.

Sheep and an Owl

I wandered out back with my camera–the real one–so I could take better photos of sheep. I like to update the sheep page on the website every year when the sheep are in full fleece. I did not update the website yet, but I took some photos with that in mind.

It’s wet behind the barn and we have a lot of piles of brush to burn (to the left out of the picture). The sheep can’t go on the newly seeded pasture so space is limited. There is a concrete pad and then a wooden bridge over the lowest spot.

As I walked towards the pasture gate the sheep were hopeful that I’d open the gate. Jade led the way.

Many of the sheep weren’t happy about the mud just past the bridge and decided they had to jump it. These are two 2024 lambs and I can’t sort them out by name yet.

This ewe is Jannie.

Cindy.

This is Sandie…

…and her twin, Pecan.

Jade.

Patchwork Bettylou, the ewe that had hernia surgery in October.

Here are three of the 2024 lambs. Harmony, Zoe, and Lily.

I walked out behind the ram pen and stood under this palm tree wondering if the resident barn owl is still around. It’s impossible to find owl pellets because, even if pellets could drop through all the old dry palm leaves, the blackberries grow around the base of the tree.

While I was standing there the owl flew out of the palm tree into one of the sheoaks.

Christmas Day

We had a Christmas Eve dinner with my brother and family, but Christmas Day was spent here on our own. The sun came out and felt wonderful after the days of fog and drizzle. I had been inspired by some visitors who came a couple of days ago (and are excellent wildlife photographers), to get my camera out and try for some real bird photos. So I went for a walk.

A view of the barn from and pasture the southwest. You don’t usually see if from this vantage point. I can’t walk very far west on this road because it is a private driveway.

I spotted a snowy egret, easy to identify with bright yellow feet.

I had not walked Across the Road for several days because it’s been so wet. I don’t want to leave big tracks on the road or carry five pounds of mud around on each boot. However, now that the grass has been growing in on the edge I can walk there without tearing up the road. Evidently, somebody tried too soon to drive on this road.

The greater egret is a larger bird and has a yellow beak and black feet.

Continuing to walk along the canal in the grass.

These mushrooms are under 3″ high.

Osage orange tree.

Osage orange fruit. It’s a strange looking fruit about the size of a grapefruit. Its easier to photograph plants than birds.

Wide-angle view of the farm from the road.

Who is Going to Lamb and When? Ultrasounds

For the last few years I’ve asked the UC Davis vets to come here and do ultrasounds. It is certainly useful to know ahead of time the ewes that are not pregnant and, hopefully, the number of lambs to expect from those that are.

I told the Dr. Smith the dates the ewes were with rams and December 20 was chosen as the optimal time for ultrasounds. (Never mind that a few ewes went in with the new ram, Eli, right at Thanksgiving. This ultrasound date was scheduled before Eli came here. It won’t be hard when the time comes to know if those few ewes will lamb.

I purposely did not breed as many ewes this year because of the limited space with our pasture being off limits for most, if not all, of the next grazing season. If you read this blog regularly then you know about the Pasture and Irrigation Renovation going on. Look back over the last few months for those blog posts.

Farm Club members came and, since I was otherwise preoccupied with an overlapping visit by my son and DIL and Matt’s offer to help me with some loom/computer issues, they did all the work of getting the sheep organized and in pens, ready for the vets.

There were four from UC Davis. I lose track of the titles, but I think one person was an intern and/or student and maybe a couple were in residency. They took turns doing the scans and reading the results, with Dr. Smith overseeing it all.

Don’t ask me what we’re seeing. I’m good when I see a ribcage go by as they move the probe around, but I have a hard time with the rest of it unless it’s pointed out. They judge size of the lamb’s head and, therefore, its gestational age. Amount of fluid and relative position of the lambs are other factors they consider.

The next group of ewes waiting.

Trading places in scanning.

Meanwhile, one reason Matt came was to climb the weeping willow and cut a couple of large branches that had broken during the summer. FIY, he is using safety gear to prevent falling in case of slips.

It’s amazing how quickly this tree has grown. Matt cut the problem branches, but then cleaned out a lot more where it overhangs the pasture and the fence.

Back at the barn they are still scanning, but we could used last year’s lambing list on the white board (to be erased at the beginning of the next lambing) to pick out which ewes had triplets last year.

Here are the stats:
Fetuses counted: 51
Sets of triplets: 2
Sets of twins: 17
Singles: 5
Sets of 2+ (twins, but not ruling out a 3rd): 3
Ewes pregnant: 27
Ewes open who were with a ram: 3
Ewes maybe pregnant, bred late by Eli: 4
Ewes not with.a ram: 7
Ewe lambs not bred: 8

Stay tuned for March 9, the first due date based on when I put rams in with ewes.

Pasture and Irrigation Renovation – Part 13

The main part of this plan was the pasture and irrigation work. However we have a couple of additional projects. One was accomplished last week. Personnel from the Solano RCD brought two owl boxes and installed them. How about that for service!

This one is on the south fence and the other is on the west. In this photo this box is being held in place with additional wood boards while the concrete in the hole hardens.

I walked out there today just after the support boards were removed. There are wood chips inside and this hole faces east. The extra panels on the top and the west side are to help with temperature control in the summer. Part of me wants to write an Owlish Address of some kind on the box.

This is the view from the road when I walked to the owl box. It is far too wet to walk through the pasture or Across the Road. So I used this as a reason to get Ginny out for a short walk.

It rained a lot last night and today and I was interested to see the pasture from different views. This is the east side looking south. The photo above this one is the east side looking northwest.

This is the same side of the pasture, but from the opposite end. There is water in the deep ruts made by the trucks when they installed those moisture sensors described in the previous post, but, other than the ruts, the lower end of the field doesn’t have the standing water that there is in the upper end. Interesting.

This is the southwest corner of the property. The standing water is in the ruts where the truck maneuvered. The soil moisture sensor is on that pole at the right. You can just see the other owl box along the fence line near one of the trees.

I walked around the west property line to the northwest corner where the concrete box is. There is standing water in the area where the trucks drove but not in the rest of the field. I think that the last work to be done is to fill in with all that extra dirt around the box. I assume that they will cover this open box, but I’m not sure. If they don’t we’ll put a wire cover on it.

Pasture and Irrigation Renovation – Part 12 – Watching Grass Grow

Yesterday’s post described seeding on November 19, just before the 4″ of rain that we got over the next 3 days. Now we’re waiting for grass to grow.

This was grass growing on December 1.

Yes, it’s there, but you have to be paying attention to see what’s happening. We’re not just watching for grass. We want to see those broad-leaf plants too.

This is three days later on December 4.

Rodents at work.

The next day the irrigation crew came back to install the flowmeter and soil moisture sensors. That tube on top of the concrete box has a something that looks like a fan or propellor on the end of it.

That is the part that is now in the pipe and the rod is mounted to the concrete box.

The pole outside the box has solar panels and some other kind of gadget on it. At this point I don’t know how any of it works. We’re going to have a lesson about how to interpret the data it will provide to my phone.

There are two soil moisture sensors at the other end of the field. We had them place those poles where there will be fence lines so the sheep won’t be tempted to rub on them.

That white spot that looks like a quarter, at the bottom of the photo, is a rod that will measure moisture at 3 depths.

That data will also be transmitted to my phone.

This is the south end of the field. It is still wet enough that when the workers drove back and forth between these moisture sensors they created deep ruts. That’s unfortunate but there is nothing that can be done now. I think we have to wait until next year and then maybe disc this and the west side of the field where there is also compaction from vehicles during the final installation. We’ll wait and see.

Now we’re just waiting for more rain and grass.

Pasture and Irrigation Renovation – Part 11

Yesterday’s post brought us up to November 19 when the work on the irrigation pipeline was almost finished. The field wasn’t yet seeded and significant rain was due that night.

There is a story about the seed. It was a special order to get the quantity and mix we specified. On November 8 we drove to the seed company in Tracy to pick it up to save on shipping cost and so it would be here when Michael was ready for it. The order wasn’t correct so the company was going to ship it to us the following week. It didn’t come on the day it was supposed to, and we didn’t want it to arrive while we were gone. It would be on a pallet which would need to be unloaded and we couldn’t risk the seed getting wet if it rained. So we scheduled delivery for the following Tuesday, the day after we’d be back from Arizona. The shipping company called on Tuesday to say it would be here Wednesday. We needed to get that seed in the ground on Tuesday because of the imminent rain.

Fortunately we were told that the seed could be taken off the truck so we could pick it up. Dan I drove to Sacramento to pick it up at the trucking company location. I texted Michael that the seed we would be back home with the seed by about 2:00.

The air seeder has two long arms that distribute the seeds as it’s being driven.

I don’t know the details of how it is set up but this is a look at the part under the hopper where the seed falls into the black tubes in a measured quantity.

There is a control here where Michael set the amount of seed to apply. He somehow calibrated it to apply 30 pounds/acre when the tractor is driven at 6 mph.

It took only a few hours to apply the seed using this equipment.

This was followed up with ring rollers to help the seed have more soil contact. It was getting dark.

After rolling the main part of the pasture, Michael had to adjust the width of the rollers to squeeze between the new valves that are 30 feet apart. This was to access the north part of the field.

Michael’s son had been riding in the cab while Michael was working. While he adjusted the rollers (and Dan was watching to make sure they cleared the valves) I took Bodie into the barn to feed the sheep with me.

Seeding was just in time. We had almost an inch and a half of rain that night.

The NRCS engineer wanted to certify the pipeline work, but now it was too muddy for people to walk or drive across the field and even on the road to the west. I walked out there by walking on the dried grass to the side of the dirt road west of our property so I could send photos. This shows the work the welder did the previous day when he could drive on that road. He cut out a circle on the horizontal pipe, matched the vertical pipe with another cut, and welded them together.

There is a precisely measured hole in the top of the horizontal pipe. I think the purpose is for air flow to help with water flow.

The finished connections that need to be covered. But, wait, they are not finished. There will be another post that shows a flow meter being installed.

Avoiding the dirt most of the way, this is how my boots looked just….

…walking across the dirt road to get to the corner of the property. I sent the engineers the required photos and these last two to show that it was not a good time for anyone to visit.

Pasture and Irrigation Renovation – Part 10

The last post I wrote about this project was on November 21, two weeks ago. At that point we had just come back from our Arizona trip The pipeline was put in while we were gone. We were anxious to get both the irrigation work and the field work finished before the real winter rain started. With it this late in the year it was certainly possible that there would have been significant rain before this time. I don’t know what we would have done if that had happened. I think the whole thing would have been put off if the ground was as wet as it is now.

So in these photos the ground is dry. This is the view from the western edge to the east. The pipeline is 15″ and the valves are 30 feet apart

That is a pretty deep trench at this end. There has to be gravity flow so I assume the west side is a little higher than the east.

View to the west.

The is the trencher they used. I was interested in that conveyor that looks as though it is just stuck in that wheel to get it out of the way. But, of course that is not the case–it is supposed to be there. . As the wheel turns, the dirt is brought up to the top where it drops onto the conveyer which drops in a long ridge next to the ditch.

This view if from the corner where the water enters our property There is a north-south pipeline buried here.

This is the connection where we get the water from the SID canal.

The concrete box is 8 feet deep. A flow meter will be placed in one of the pipes.

Another private contractor showed up this day. He is a welder and his job was to cut a hole in the horizontal pipe and shape and then weld an upright pipe onto the horizontal one. I think it is to allow air flow in the pipe so that the water will flow better.

This is the row of valves after the trench has been mostly filled in.

This was all finished just in time before heavy rain was predicted to start. The other crucial task was to get the field seeded before rain made it impossible to drive a tractor across the field. Rain was due by sometime during the night.

To be continued because I’m too tired…

Using the Whole Sheep – Sheepskins

I started raising sheep because I wanted to produce wool. For me lamb meat (Gourmet Lamb on my website) is a by-product of my wool and fiber business, although for most sheep raisers wool may be the by-product. I make a point to use as much of the sheep as possible. Sheepskins are a major by-product of the lamb business. I thought I’d show what goes into producing a beautiful sheepskin.

I don’t have photos of the process of getting the sheepskin from the sheep. That is not something I should put here, but I will say that the person who harvests the sheep is very fast and does an excellent job of getting the skin off the carcass in good shape. My job is to cut off extra skin that came from the legs and salt the pelts as soon as possible to prevent them from decaying.

I ran into trouble this year getting the right salt. You need to use fine salt to cover the most surface area. The one on the left is what I usually use, but it was out of stock for part of the summer. You’d think that the one on the right would be OK since it’s labeled “fine”, however it is not nearly as fine as the “solar mixing salt”.

Dan built this rack a couple of years ago so the hides won’t take up as much room as if they were spread out. I have covered hide with a layer of salt, making sure that all parts of the hide are covered.

Even though I had the rack I had to spread some hides on pallets when there were too many to fit. It the middle of the summer they dry enough within a week to move to a stack. If the weather changes and there is moisture in the air sometimes the pelts still feel damp.

You’re not supposed to dry the pelts in the sun, but I after the initial drying and before shipping I may spread them out for a few hours. After the salt has done its job of drawing the moisture out of the skin it sometimes draws moisture from the air and I don’t want there to be extra moisture when I ship them to the tannery.

I flipped them over and dried both sides.

A stack of pelts. The next job is to find an adequate box. I sold a couple of looms this year and still had the boxes. I’m trying to remember now if I was able to fit ten pelts in a loom box.

I take photos of the hides before boxing them. With the two tanneries I am using now I don’t think I have to worry about this step. Over the last few years I have tried three other tanneries. One is now out of business. One is all the way across the country and takes a longer time. The other (in California) sent hides back that were definitely not mine. That’s what prompted me to start taking photos before shipping.

I am satisfied now with the two tanneries I will continue to use. Driftless Tannery is in Wisconsin. Living Sky is in Idaho and last year I was able to deliver hides when I visited my son and DIL in Boise. This year I shipped them all. Both tanneries use mimosa bark for their tanning process. This is a more environmentally friendly alternative than methods that some tanneries use. I also like the resulting leather–it is flexible, yet sturdy.

I have photos of the front and back of each hide. People ask me how the hides are tanned. My answer is that it is magic. The photos don’t show how bad these hides look when I ship them. They are stiff and the wool is dirty, including hay, grass, and blood. The tanneries work magic and the hides are returned clean and fluffy.

I went through my photos and found some that I could match up with the finished sheepskins.

These are three of the hides that came back from Idaho. Can you match the first two up to the photo above? The middle sheepskin is the one on the top right in the photo above. I think the sheepskin on the left is the one in the lower left of the photo with six. Magic!

This is from the batch I sent to Wisconsin.

The sheepskin on the left is the middle one on the bottom row in the photo above. The middle sheepskin is middle, top row above. The one on the right is in the lower left corner above. More magic!

When I get the sheepskins back I need to measure and photograph each one so I can put them on the website. See this page for all that I have listed.